Since the containerization become a trendy thingy in recent years, container ochestration has been coming out along with it as well. Among its contenders, Kubernetes stands out quickly some various reasons and advantages.
What is CKA
Certified Kubernetes Administrator (CKA) was created by The Linux Foundation and the Cloud Native Computing Foundation (CNCF) as a part of their ongoing effort to help develop the Kubernetes ecosystem.
To buy the exam, please refer to https://training.linuxfoundation.org/certification/certified-kubernetes-administrator-cka/
up until this moment(Jan 5th 2023), it costs $395 for exam only on the official website. Just a little tips for saving money, you can find lots of coupons online to get 20%-30% off. Additionally if you buy it on Black Friday sale, it could only cost half of its current price. So timing is important too. Please get well prepared in advance.
Learning Kubernetes
Of course wiht no doubt, kubernetes official website is the best place to learn it. You should go through all the content as detailed as you can to master the kubernetes knowledege.
https://kubernetes.io/docs/home/
In order to pass the exam with minimal knowledge, it’s better to look at the CKA curriculum.
https://github.com/cncf/curriculum/
Just for convenince, let me lift and shift the CKA curriculum here.
25% - Cluster Architecture, Installation & Configuration
- Manage role based access control (RBAC)
- Use Kubeadm to install a basic cluster
- Manage a highly-available Kubernetes cluster
- Provision underlying infrastructure to deploy a Kubernetes cluster
- Perform a version upgrade on a Kubernetes cluster using Kubeadm
- Implement etcd backup and restore
15% - Workloads & Scheduling
- Understand deployments and how to perform rolling update and rollbacks
- Use ConfigMaps and Secrets to configure applications
- Know how to scale applications
- Understand the primitives used to create robust, self-healing, application deployments
- Understand how resource limits can affect Pod scheduling
- Awareness of manifest management and common templating tools
20% - Services & Networking
- Understand host networking configuration on the cluster nodes
- Understand connectivity between Pods
- Understand ClusterIP, NodePort, LoadBalancer service types and endpoints
- Know how to use Ingress controllers and Ingress resources
- Know how to configure and use CoreDNS
- Choose an appropriate container network interface plugin
10% - Storage
- Understand storage classes, persistent volumes
- Understand volume mode, access modes and reclaim policies for volumes
- Understand persistent volume claims primitive
- Know how to configure applications with persistent storage
30% - Troubleshooting
- Evaluate cluster and node logging
- Understand how to monitor applications
- Manage container stdout & stderr logs
- Troubleshoot application failure
- Troubleshoot cluster component failure
- Troubleshoot networking
I would suggest at least 3 months learning prior to the exam for someone who has zero knowledege about kubernetes before. However if you are experienced player in this area, 1 month is more than enough.
CKA Exam tips
Command tips
# this is usually configurd in the exam's terminal
alias k=kubectl
complete -o default -F __start_kubectl k


# vim setting
cat <<EOF > ~/.vimrc
set expandtab
set tabstop=2
set shiftwidth=2
EOF


export do="--dry-run=client -o yaml"
export now="--force --grace-period 0"   # k delete pod x $now
All the commands listed here must be rememebered back to front - kubectl Cheat Sheet
Mock Exam
k8s playground: https://killercoda.com/playgrounds/scenario/kubernetes where you could do your own experiments
Interactive Scenarios for CKA https://killercoda.com/killer-shell-cka where you can practice specifically for CKA cases
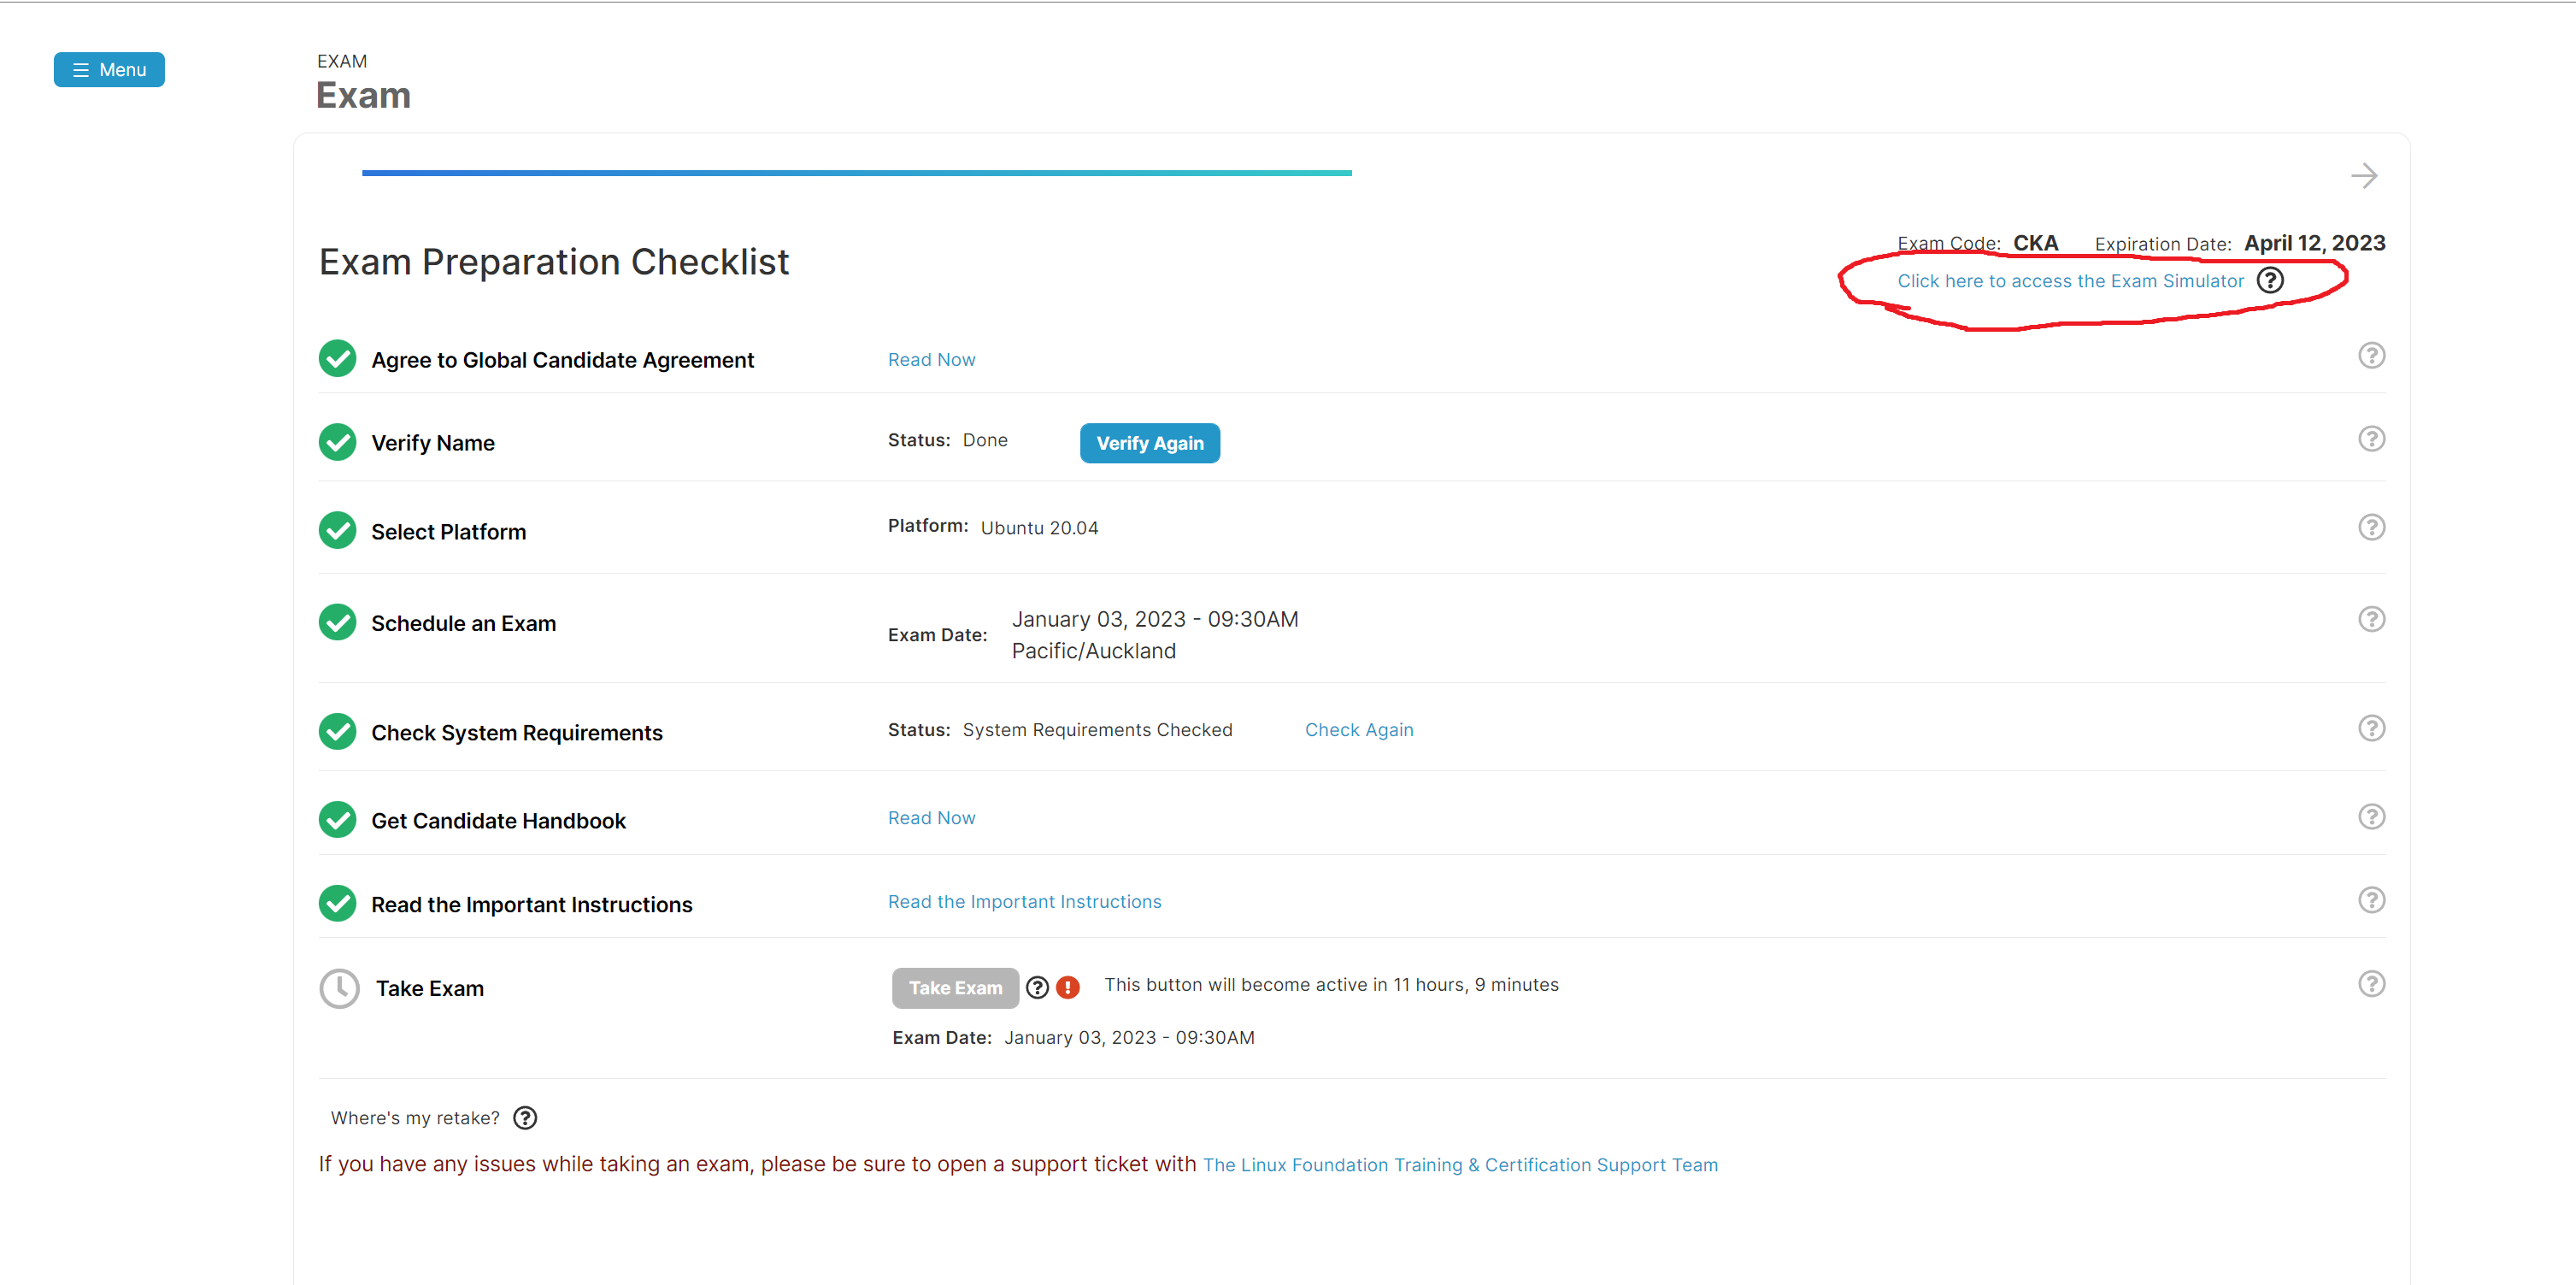
But most importantly, remember to make most of the CKA official mock exam, which ic way more difficult than the real exam. You can activate the remote desktop simulator twice and each for 36 hours. It’s recommended that go through all the tests very carefully and thoroughly so you can learn the required knowledge in the deep. In the meantinme, make a note to review those tasks especially you failed, and learn the correct way to accomplish the task.
Key Points
context
check k8s context informatino and switch between k8s context s
kubectl config -h
kubectl config view
kubectl config get-contexts                          # display list of contexts
kubectl config current-context                       # display the current-context
kubectl config use-context my-cluster-name           # switch context
control plane node
controlplane $ cd /etc/kubernetes/manifests/
controlplane $ ls
etcd.yaml  kube-apiserver.yaml  kube-controller-manager.yaml  kube-scheduler.yaml
kubelet is running as a service on control plane node
systemctl status kubelet
ps aux | grep kubelet
/usr/bin/kubelet --bootstrap-kubeconfig=/etc/kubernetes/bootstrap-kubelet.conf --kubeconfig=/etc/kubernetes/kubelet.conf --config=/var/lib/kubelet/config.yaml --container-runtime-endpoin=......
certificates configuration is in /etc/kubernetes/pki
To manage the certs in the cluster, use kubeadm certs -h
upgrade
you must know how to upgrade control plane and work nodes via kubeadm https://kubernetes.io/docs/tasks/administer-cluster/kubeadm/kubeadm-upgrade/
remeber to drain the node, cordon the node before upgrading. uncordon the node after it;s done.
join the node to the cluster https://kubernetes.io/docs/reference/setup-tools/kubeadm/kubeadm-join/
kubeadm join -h

# execute this on control plane
kubeadm token create --print-join-command
etcd and restore
https://kubernetes.io/docs/tasks/administer-cluster/configure-upgrade-etcd/
The API version used by etcdctl to speak to etcd may be set to version 2 or 3 via the ETCDCTL_API environment variable. export ETCDCTL_API=3
ETCDCTL_API=3 etcdctl --endpoints=https://127.0.0.1:2379 \
  --cacert=<trusted-ca-file> --cert=<cert-file> --key=<key-file> \
  snapshot save <backup-file-location>
etcd file location is at /etc/kubernetes/manifests/etcd.yaml where you can find endpoints, cacert, cert, key
ETCDCTL_API=3 etcdctl snapshot restore --data-dir <data-dir-location> <backup-file-location>
nodes
#show more information
kubectl get nodes -o wide

kubectl get nodes --show-labels
--show-labels is really useful when you want to get labels of node, specify the nodeSelector in pod definition, or tolerations, and nodeAffinity etc.
namespace
kubectl create ns my-namespace
kubectl api-resources --namespaced
deployment
https://kubernetes.io/docs/concepts/workloads/controllers/deployment/
know how to scaling, rolling out/back the deployment
kubectl create deployment my-dep --image=nginx --replicas=3 $do
kubectl create deployment my-dep --image=busybox --port=5701 $do
scale application
kubectl scale --replicas=3 rs/foo                                 # Scale a replicaset named 'foo' to 3

# please refer to help
kubectl sacle -h
pods
kubectl get pods --show-labels
kubectl get pods -0 wide
kubectl get pods -l="app=backend"
kubectl get pods -A --sort-by='.metadata.creationTimestamp'
kubectl -n my-namespace get pods
take advantage of dry-run to generate a yaml to use
kubectl -n myspace run pod-name --image=nginx:alpine --port=80 $do

# Start the nginx pod using a different command and custom arguments
kubectl run nginx --image=nginx --command -- <cmd> <arg1> ... <argN>
static pods
https://kubernetes.io/docs/tasks/configure-pod-container/static-pod/
ssh into node, cd /etc/kubernetes/manifests, where you can create static pods
daemonset
https://kubernetes.io/docs/concepts/workloads/controllers/daemonset/
serivce
https://kubernetes.io/docs/concepts/services-networking/service/ https://kubernetes.io/docs/tasks/debug/debug-application/debug-service/
kubectl create service -h
know the different type of services, ClusterIP, NodePort, LoadBalancer, ExternalName understand the concept of Endpoints and EndpointSlices
you should be able to curl the internal-service-ip:service-port for ClusterIP type. while for NodePort, you can curl node-ip:nodeport.
DNS
https://kubernetes.io/docs/concepts/services-networking/dns-pod-service/
Services DNS: my-svc.my-namespace.svc.cluster-domain.example Pods DNS: pod-ip-address.my-namespace.pod.cluster-domain.example
for example, a pod has the DNS name 172-17-0-3.default.pod.cluster.local.
Any Pods exposed by a Service have the following DNS resolution available:
pod-ip-address.service-name.my-namespace.svc.cluster-domain.example
and remember the host file is here in Linux /etc/resolv.conf
for debugging and testing the connectivity,
kubectl run test-nslookup --image=busybox:1.28 --rm -it --restart=Never -- nslookup <DNS-Name>
ingress
https://kubernetes.io/docs/concepts/services-networking/ingress/
know a little bit of ingress class which you may or may not need to specify in the yaml
remember the “Simple fanout” example. You will most likely to use this one and feel free to modify it based on your demands.
apiVersion: networking.k8s.io/v1
kind: Ingress
metadata:
  name: simple-fanout-example
spec:
  rules:
    - host: foo.bar.com
      http:
        paths:
          - path: /foo
            pathType: Prefix
            backend:
              service:
                name: service1
                port:
                  number: 4200
          - path: /bar
            pathType: Prefix
            backend:
              service:
                name: service2
                port:
                  number: 8080
networkpolicy
https://kubernetes.io/docs/concepts/services-networking/network-policies/
you need to know how to create network policy that allows connections from a specific namespace or reach out to some namespace on a designated port and protocol.
in order to validate connectivity, you can use curl to see if it reaches to the target. here are the examples.
kubectl -n space1 exec app1-0 -- curl -m 1 microservice1.space2.svc.cluster.local

kubectl -n space1 exec app1-0 -- nslookup tester.default.svc.cluster.local

kubectl -n kube-system exec -it validate-checker-pod -- curl -m 1 app1.space1.svc.cluster.local
confimaps, secrets, enviroment variables
https://kubernetes.io/docs/concepts/configuration/configmap/
https://kubernetes.io/docs/concepts/configuration/secret/
https://kubernetes.io/docs/tasks/inject-data-application/environment-variable-expose-pod-information/
storage
understand PV,PVC and how to assign PVC to a pod
https://kubernetes.io/docs/tasks/configure-pod-container/configure-persistent-volume-storage/
know the hostPath, emptyDir, sidecar deployment
assign pods to a node
https://kubernetes.io/docs/concepts/scheduling-eviction/assign-pod-node/
nodeName nodeSelector nodeAffinity
pod Topology Spread
https://kubernetes.io/docs/concepts/scheduling-eviction/topology-spread-constraints/
make sure you understand these options
apiVersion: v1
kind: Pod
metadata:
  name: example-pod
spec:
  # Configure a topology spread constraint
  topologySpreadConstraints:
    - maxSkew: <integer>
      minDomains: <integer> # optional; beta since v1.25
      topologyKey: <string>
      whenUnsatisfiable: <string>
      labelSelector: <object>
      matchLabelKeys: <list> # optional; alpha since v1.25
      nodeAffinityPolicy: [Honor|Ignore] # optional; beta since v1.26
      nodeTaintsPolicy: [Honor|Ignore] # optional; beta since v1.26
  ### other Pod fields go here
tains and toleration
kubectl get node cluster1-controlplane1 | grep taints -A 5 -B 5
fore example, you need to add tolerations to enable pod to be able to scheduled on the control plane node if it has taint.
apiVersion: v1
kind: Pod
metadata:
  creationTimestamp: null
  labels:
    run: pod1
  name: pod1
spec:
  containers:
    - image: httpd:2.4.41-alpine
      name: pod1-container
      resources: {}
  dnsPolicy: ClusterFirst
  restartPolicy: Always
  tolerations: # add
    - effect: NoSchedule # add
      key: node-role.kubernetes.io/control-plane # add
  nodeSelector: # add
    node-role.kubernetes.io/control-plane: "" # add
status: {}
service account
Service accounts authenticate with the username system:serviceaccount:(NAMESPACE):(SERVICEACCOUNT), and are assigned to the groups system:serviceaccounts and system:serviceaccounts:(NAMESPACE)
kubectl create serviceaccount pipeline -n ns1
RBAC
https://kubernetes.io/docs/reference/access-authn-authz/rbac/
please remember this concept so you won’t get wrong on any RBAC task
A ClusterRole|Role defines a set of permissions and where it is available, in the whole cluster or >just a single Namespace.
A ClusterRoleBinding|RoleBinding connects a set of permissions with an account and defines where it is >applied, in the whole cluster or just a single Namespace.
Because of this there are 4 different RBAC combinations and 3 valid ones:
Role + RoleBinding (available in single Namespace, applied in single Namespace) ClusterRole + ClusterRoleBinding (available cluster-wide, applied cluster-wide) ClusterRole + RoleBinding (available cluster-wide, applied in single Namespace) Role + ClusterRoleBinding (NOT POSSIBLE: available in single Namespace, applied cluster-wide)
for example,
kubectl create clusterrole pipeline-deployment-manager --verb=create,delete --resource=deployments
kubectl -n ns1 create rolebinding pipeline-deployment-rb --clusterrole=pipeline-deployment-manager --serviceaccount=ns1:pipeline
verbs: ["get", "list", "watch", "create", "update", "patch", "delete"] just for reference.
to verify the access control, you can use kubectl auth can-i
kubectl  auth can-i -h
kubectl  -n ns1 auth can-i create deployment --as system:serviceaccount:ns1:pipeline
security context
https://kubernetes.io/docs/tasks/configure-pod-container/security-context/
securityContext:
  runAsUser: 1000
  runAsGroup: 3000
  fsGroup: 2000
securityContext:
  allowPrivilegeEscalation: false
monitoring
this part is really easy and you should get all the score of it.
kubectl top node
kubectl top pod -A --containers=true
debugging
kubectl describe -h
kubectl logs -h

# for example
kubectl describe pod nginx-pod
kubectl -n management logs deploy/collect-data -c nginx
tap into a pod,
kubectl -n kube-system exec -it validate-checker-pod -- curl -m 1 microservice2.space2.svc.cluster.local
create a temporary pod to debug
kubectl run test-nslookup --image=busybox:1.28 --rm -it --restart=Never -- nslookup nginx-resolver-service
Relax and Stay Calm
Bear in mind that, you only need score 66/100 to pass the exam. As for me, I got 85 which is not perfect but more than enough too.
To be honest, 2-hour exam time is a little bit tight and most likely you don’t have much time to double check if you finished the tasks correctly. So my advice is that you should do the simple tasks first and make sure you get the score out of them. Flag the complex scenario task and go back to work on it when you have time left in the end.
Last but not least
Hoep any reader benefit from my article and wish you pass the exam succesffully on the first trail of course. Please let me know the feedback if possible. Thank you!